Download PDF
The AtlasFive Business REST API
Supplemental Documentation
Table of Content
1 Introduction
1.1 What is the AtlasFive Business REST API?
1.2 Getting started with REST API Basic elements
1.2.1 Basic Elements
1.2.2 Authorization, Authentication and Version
1.3 How to add and sign-in the AtlasFive API?
1.3.1 Excel Users
1.3.2 PowerBI Users
1.4 How to add a new API connection to an existing template?
1.4.1 Excel
1.4.2 PowerBI
1.5 Adding a GET method API connection example
1.5.1 Excel Template for adding a GET method API connection (GetHoldings)
1.5.2 PowerBI Template for adding a GET method API connection (GetHoldings)
1.6 Adding a POST method API connection example
1.7 Configuring the body of the API request
2 Successful API Responses
3 Client Error API Responses
4 Server Error API Responses
5 Other Common Excel/PowerBI Errors and Troubleshooting
6 Architecture and Technical Limitations of the API
6.1 Architecture
6.2 Technical Limitations
7 How to Request Help?
8 Supplemental Steps to Disable Privacy Level Settings
1 Introduction
1.1 What is the AtlasFive Business REST API?
The AtlasFive Business REST APIs are a set of REST APIs implemented on a serverless architecture. They provide access to AtlasFive curated data and allow external users and app developers to use our data for custom integrations to support their business analytics and reporting needs. The Business APIs allows Eton Solutions clients to integrate AtlasFive into their enterprise ecosystem programmatically without relying on the AtlasFive front end. Our REST APIs let clients access and manipulate our data in various ways.
For example, with our AtlasFive Business Rest APIs, you can:
Extend capabilities: Build custom integrations to better support your business needs.
Automate workflows: Automate workflows by programmatically accessing and integrating AtlasFive data into your enterprise ecosystem, without relying on the AtlasFive front end.
Source the most recent data: Use the APIs as the single access point for the most recently updated data.
Augment data: Clean, enrich, manipulate and augment data to suit your reporting needs.
Expand analytics and reporting: Source API data into the tool of your choice, such as Python, R, CL using Curl, Postman, Excel, PowerBI to acquire richer insights and develop custom reporting solutions.
1.2 Getting started with REST API basic elements
1.2.1 Basic Elements
The abbreviation of REST stands for Representational State Transfer, and API stands for Application Programming Interface.
The REST API consists of the following elements:
The Endpoint: This is the URL of the resource to which we are going to place the requests. For example: https://api.powerbi.com/v1.0/myorg/
The Method: Although there are multiple methods to call REST APIs, the AtlasFive Business API uses the GET and POST methods.
The GET method is used to retrieve resources. A GET request retrieves data from a web server by specifying parameters in the URL portion of the request. You can see the parameters passed by just looking at the URL. For example, in the URL below the parameters are underlined: https://api.familyoperations.com/clientx/v1/GetHoldings?tenantKey=26&portfolioKey=86&entityKey=-12345&dataType=holdings&relationshipKey=126&asOfDate=2021-08-14&stateFilter=%7B%7D
The POST method is used to create resources. Unlike the GET request, the POST method does not pass the parameters at the end of the URL. Rather, the POST method contains the list of parameters in the body of the request. POST is normally used to update an account, submit an order, etc.
The Headers: The authentication mode and the content types.
The Data (Body): Textual data in the form of JSON, which needs to be sent to the resource.
All API access is over HTTPS. All data is sent and received as JSON.
Blank fields are included as null instead of being omitted.
1.2.2 Authorization, Authentication and Version
All AtlasFive Business API requests require authentication. The current authorization protocol used is OAuth2.
OAuth2 uses Access Tokens. An Access Token is a piece of data that represents the authorization to access resources on behalf of the end user. The JSON Web Token format is used, which enables token issuers to include data in the token itself. For security reasons, Access Tokens have an expiration time and date, and need to be refreshed periodically.
The Version of the AtlasFive API will change periodically as new releases occur. Currently, all AtlasFive APIs are using Version 3.
1.3 How to add and sign-in the AtlasFive API?
1.3.1 Excel Users
Eton Solutions created a custom Excel add-in to facilitate multi-factor authentication for registered Excel users. A registered user has had their account set up by Eton Solutions IT. For the user account to be set up, the user must submit a service desk request. The steps below outline how to add the custom add-in, which, once installed, will load as a side-bar in Excel as shown below:

After the user account has been set up, the user must follow the steps below:
1. Open Windows PowerShell
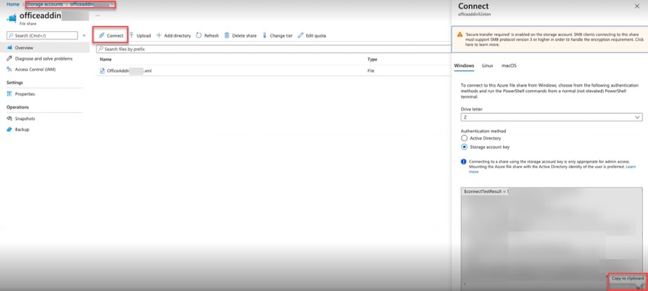
2. Insert the connection string. To get the connection string, go to the designated storage account, click on connect, and copy the connection string as shown below:
3. Paste the copied the connection into Windows PowerShell and press enter.
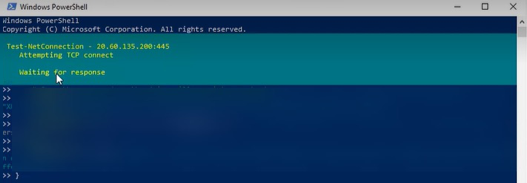
4. If the credential was added successfully, the user will see the confirmation message below:

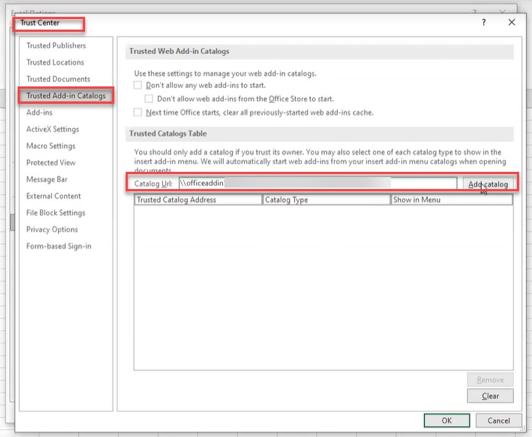
5. In the Excel template, open File → Options → Trust Center → Trusted Add-in Catalogs and in the Catalog Url paste the url from the connection string. The url is located between the double quotes in the #Mount the drive section of the connection string, as shown below:

6. Paste the url in the Catalog Url section in the opened Excel Trust Center as shown below and click on Add Catalog:
7. Check the "Show in Menu" check mark and click OK.
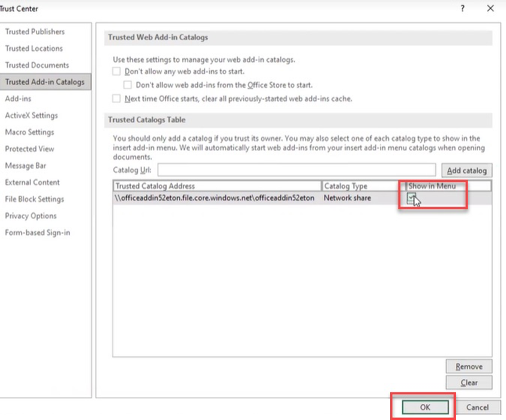
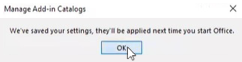
8. Check the "Show in Menu" check mark and click OK. You may get a notification like the one below. Click OK to agree and OK to exit from the Excel options menu:
9. Close all Excel spreadsheets and re-open the template file.
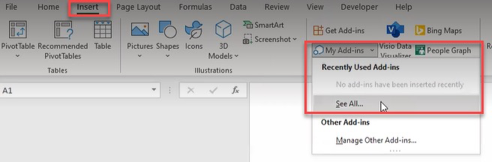
10. Go to Insert → My add ins → See All as shown below:
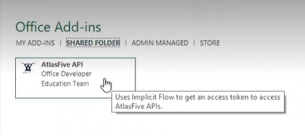
11. In the Office Add-ins menu, go to the Shared Folder and select the AtlasFive API add-in, and click add.
12. The add-in should appear at the end of the task bar as shown:

13. Once the add-in has loaded, in the first sheet of the template named "Authentication Token", select cell B1, click Sign in in the side bar, and then select your user account. That will generate the bearer token in cell B2, which will then be passed into the API request headers.

You have now successfully authenticated and are ready to use the template!
1.3.2 PowerBI Users
The buildout of MFA for PowerBI Users is currently in progress.
1.4 How to add a new API connection to an existing template?
1.4.1 Excel
Important Considerations
The current template consists of user input tabs and API data tabs. The user input tabs are the Token1 tab, the Authorization Credentials tab, and the API Query Customization tab.
The Token1 and Authorization Credentials tabs contains the subscription details required for the user to obtain the necessary authentication token.
The API Query Customization tab contains API endpoints and body parameters that can be configured by the user directly through this tab. This tab allows the user to insert information in certain fields in the main Excel spreadsheet. That information (such as the API URL) is transformed into parameters in the Advanced Editor and passed on to the API through the API request.
Note, however, that while many of the API requests have the same body parameters (such as version, entityKey, filters, sort, offset, limit), some API requests have different or additional parameters. The sections below will provide practical examples of how to add a new API request to an existing template when the body of the new request is different.
The data tabs contain the API response data.
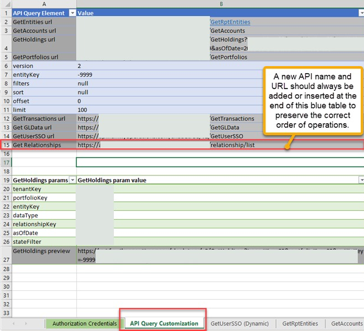
Make sure that any new rows containing new API URL are inserted at the end of the list with existing API URLs (as shown in Step 1 below).
The order in which the URLs are represented in the API Query Customization tab is important, because the tool that configures the Excel spreadsheets to source data from APIs (called Microsoft Excel PowerQuery) relies on the order in which data is entered into the API Query Customization sheet. Therefore, changing the order of the elements in the API Query Customization tab by inserting a row in between existing rows, rather than at the end of the table will result in processing errors and prevent the user from being able to connect to the API.
PowerQuery is a Microsoft tool that simplifies the process of importing data from different source files and sorting them into an Excel sheet. Power Query is a user-friendly business intelligence tool that does not require the user to learn any specific code. When a user creates a data transformation in the power query editor point-and-click UI, Excel is writing the corresponding code for the query. The code is written in a language called M code. M is a functional language which means it is primarily written with functions that are called to evaluate and return results.
The PowerQuery Advanced Editor stores all the operations executed upon a data object in the order in which they were executed.
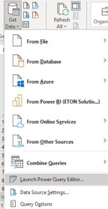
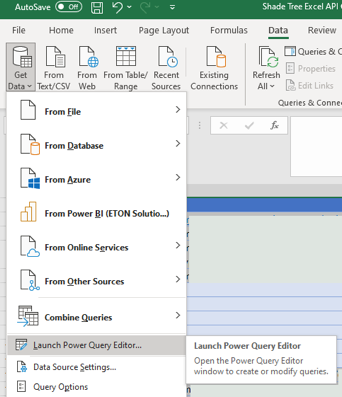
To access the Advanced Editor, go to the Data tab, click on "Get Data" and select "Launch Power Query Editor" as demonstrated below:
A correctly constructed API request means that the user will succeed in sourcing data from the API.
Instructions
To add a new API connection in the Excel spreadsheet, follow the instructions below:
1. In the API Query Customization tab, add a new row with the name of the API and the API URL as demonstrated in the screenshot below.
2. Go to the Data menu, chose the Get Data dropdown, and select the “Launch PowerQuery Editor” option, as shown below.
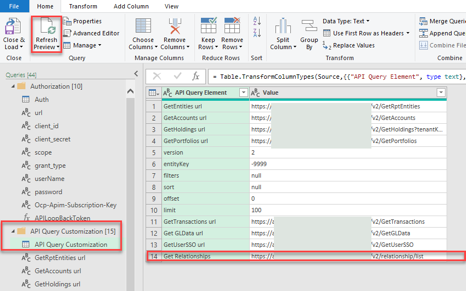
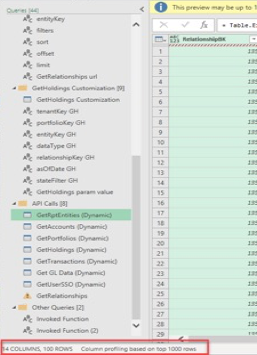
3. Once the PowerQuery Editor is open, check that the new row got added to the API Query Customization table located under the API Query Customization folder. If the row was not added, click "Refresh Preview", as shown below:
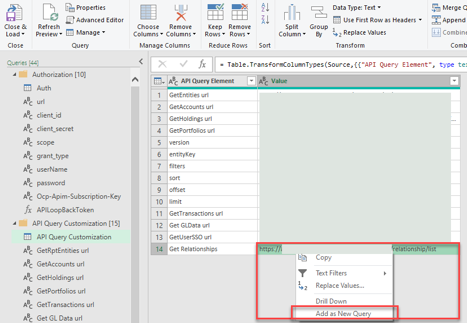
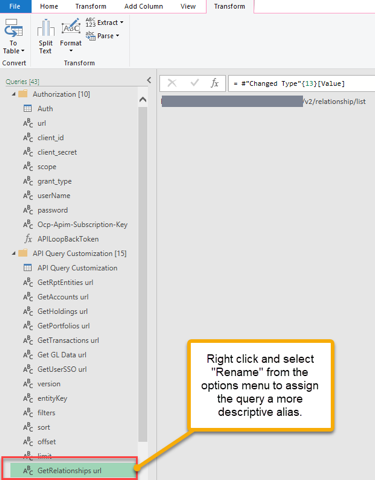
4. Right click the new API URL and click "Add as New Query".
5. The new "Value" will be added as shown below. To maintain clarity and consistency with the rest of the document, rename the "Value" to a more descriptive name, such as "GetRelationships URL".

6. Go to the API Calls folder and select any of the existing tables. In this example, we will be duplicating the GetRptEntities table. Right click the table and select "Duplicate".
7. This will duplicate the existing table and assign it an automatic name with a (2) at the end to denote that there are 2 versions of the same table in the API Calls folder.
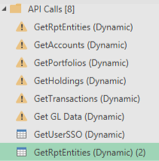
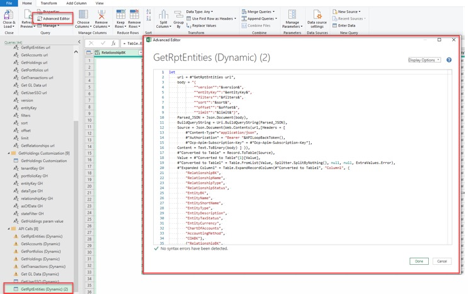
8. With the table selected click on the "Advanced Editor" to view the M code. Note that the URL and "Expanded Column" sections are at this stage specific to the details of the table you duplicated. As such, the URL in this example is "GetRptEntities URL".
9. To configure our spreadsheet with the GetRelationships URL, we must:
Replace the url
1. #"GetRptEntities URL"replace with the correct URL of the new API, that is:
1. #"GetRelationships URL"Replace the body of the call with the correct body corresponding to the new API request.
Note that some requests do not have a body. We will explore an example of that case in Section 1.5. Also note that the elements in the GetRptEntities body are different from the elements in the GetRelationships body and will need to be edited. Currently, GetRptEntities is dynamically pulling the body parameters from the API Query Customization tab of the template. Given that many of the POST API requests in AtlasFive Business API share the same body, we configured the template to allow the user to change the parameters in the API Query Customization tab, which is more convenient than having to manually edit each API query. However, not all POST API requests have the same body. In that case, the user can edit the M code in the Advanced Editor as outlined below.GetRptEntities body parameters are dynamically sourced from the API Query Customization tab, as demonstrated by the "&" symbols:
1.  body = "{
2.           ""version"":"&version&",
3.           ""entityKey"":"&entityKey&",
4.           ""filters"":"&filters&",
5.           ""sort"":"&sort&",
6.           ""offset"":"&offset&",
7.           ""limit"":"&limit&"}",
The body corresponding to the GetRelationships request can be found in the AtlasFive API Documentation file, and is represented in JSON format:
1.    {
2.      "filters": {
3.        "relationships": [ ],
4.        "entities": [ ],
5.        "accounts": [ ],
6.        "portfolios": [ ],
7.        "legacyRelationshipIds": [ ]
8.      }
9.    }
Paste the body from the documentation into the PowerQuery Advanced Editor. There are two possible options to edit the body of the API request. Both options will lead to the same API response, and neither option is superior.
Option #1: Default option using Json.Document() function:
This is the default option used in the Excel template, because the default Excel spreadsheet is set up to allow the user to modify the elements of the body through the API Query Customization tab.
The only modification to the JSON body from the documentation is the additional quotations that help M code correctly interpret and pass the body in the API request. The additional quotations are highlighted in red below:
1.  body = "{
2.            ""filters"": {
3.               ""relationships"":""[]"",
4.               ""entities"":""[]"",
5.               ""accounts"":""[]"",
6.               ""portfolios"":""[]"",
7.               ""legacyRelationshipIds"":""[]""
8.             }
9.          }",
Option #2: Alternative option using Json.FromValue() function:
In this option, we are using a PowerBI function called Json.FromValue(), which can read and interpret JSON and does not require the user to add additional quotation marks around the body elements. However, since we are using a different function, we must remove the body, parsed_JSON,and BuildQueryString lines from the M code (see table below, lines 3-11) and modify the content line (see table below, line 16).
1.  Content = Json.FromValue([
2.              filters= [
3.                relationships=[ ],
4.                entities=[ ],
5.                accounts=[ ],
6.                portfolios=[ ],
7.                legacyRelationshipIds=[ ]
8.              ]
9.            ] ) ] )),
Replace the expanded column section with the correct column names that exist in the new API.
The correct column names can be found in the API documentation file.Note that you do not need to pull in all the available columns in the request, but you should specify at least one column name.
The flexibility of the API allows the user to only pull the columns the user needs for the analysis.1. #"Expanded Column1" = Table.ExpandRecordColumn(#"Converted to Table1", "Column1", {
2. "RelationshipBK",
3. "RelationshipName",
4. "RelationshipType",
5. "RelationshipStatus",
6. "EntityBK",
7. "EntityName",
8. "EntityShortName",
9. "EntityType",
10. "EntityDescription",
11. "EntityTaxStatus",
12. "EntityCurrency",
13. "ChartOfAccounts",
14. "AccountingMethod",
15. "COABK"},
16. {
17. "RelationshipBK",
18. "RelationshipName",
19. "RelationshipType",
20. "RelationshipStatus",
21. "EntityBK",
22. "EntityName",
23. "EntityShortName",
24. "EntityType",
25. "EntityDescription",
26. "EntityTaxStatus",
27. "EntityCurrency",
28. "ChartOfAccounts",
29. "AccountingMethod",
30. "COABK"})
31. in
32. #"Expanded Column1"
The side-by-side comparison below demonstrates the differences between the GetRptEntities and GetRelationships M code, as well as the differences between the GetRelationships queries using Option#1 and Option#2 for editing the body of the request.
POST/GetRptEntities
(Json.Document)
POST/GetRelationships
(Option#1: Json.Document)
POST/GetRelationships
(Option#2: Json.FromValue)
1.  let
2.  url = #"GetRptEntities url",
3.  body = "{
4.   ""version"":"&version&",
5.   ""entityKey"":"&entityKey&",
6.   ""filters"":"&filters&",
7.   ""sort"":"&sort&",
8.   ""offset"":"&offset&",
9.   ""limit"":"&limit&"}",
10. Parsed_JSON = Json.Document(body),
11. BuildQueryString =
    Uri.BuildQueryString(Parsed_JSON),
12. Source = Json.Document(
    Web.Contents(url,[Headers = [
13. #"Content-Type"="application/json",
14. #"Authorization" = "Bearer"&Token1,
15. #"Ocp-Apim-Subscription-Key" =
    #"Ocp-Apim-Subscription-Key"],
16. Content = Text.ToBinary(body)])),


17. #"Converted to Table" =
    Record.ToTable(Source),
18. Value =
    #"Converted to Table"{1}[Value],
19. #"Converted to Table1" =
    Table.FromList(Value,
    Splitter.SplitByNothing(), null,
    null, ExtraValues.Error),
20. #"Expanded Column1" =
    Table.ExpandRecordColumn(
    #"Converted to Table1", "Column1",
    {
21.  "RelationshipBK",
22.  "RelationshipName",
23.  "RelationshipType",
24.  "RelationshipStatus",
25.  "EntityBK",
26.  "EntityName",
27.  "EntityShortName",
28.  "EntityType",
29.  "EntityDescription",
30.  "EntityTaxStatus",
31.  "EntityCurrency",
32.  "ChartOfAccounts",
33.  "AccountingMethod",
34.  "COABK"},
35. {"RelationshipBK",
36.  "RelationshipName",
37.  "RelationshipType",
38.  "RelationshipStatus",
39.  "EntityBK",
40.  "EntityName",
41.  "EntityShortName",
42.  "EntityType",
43.  "EntityDescription",
44.  "EntityTaxStatus",
45.  "EntityCurrency",
46.  "ChartOfAccounts",
47.  "AccountingMethod",
48.  "COABK"})
49. in #"Expanded Column1"
1.  let
2.  url = #"GetRelationships url",
3.  body = "{
4.  ""filters"": {
5.   ""relationships"":""[]"",
6.   ""entities"":""[]"",
7.   ""accounts"":""[]"",
8.   ""portfolios"":""[]"",
9.   ""legacyRelationshipIds"":""[]""}}",
10. Parsed_JSON = Json.Document(body),
11. BuildQueryString =
    Uri.BuildQueryString(Parsed_JSON),
12. Source = Json.Document(
    Web.Contents(url,[Headers = [
13. #"Content-Type"="application/json",
14. #"Authorization" = "Bearer"&Token1,
15. #"Ocp-Apim-Subscription-Key" =
    #"Ocp-Apim-Subscription-Key"],
16. Content = Text.ToBinary(body)])),


17. Response = Source[Response],

18.

19. #"Converted to Table" =
    Table.FromList(Response,
    Splitter.SplitByNothing(), null,
    null, ExtraValues.Error),
20. #"Expanded Column1" =
    Table.ExpandRecordColumn(
    #"Converted to Table", "Column1",
    {
21.  "relationshipKey",
22.  "relationshipName",
23.  "relationshipDescription",
24.  "relationshipWealthSource",
25.  "relationshipTypeKey",
26.  "relationshipNotes",
27.  "relationshipStatusKey",
28.  "legacyId",
29.  "isInEdit",
30. },
31. {
32.  "relationshipKey",
33.  "relationshipName",
34.  "relationshipDescription",
35.  "relationshipWealthSource",
36.  "relationshipTypeKey",
37.  "relationshipNotes",
38.  "relationshipStatusKey",
39.  "legacyId",
40.  "isInEdit",
41. })
42. in
43. #"Expanded Column1"
44.
45.
46.
47.
48.
49.
1.  let
2.  url = #"GetRelationships url",
3.
4.
5.
6.
7.
8.
9.
10.
11.

12. Source = Json.Document(
    Web.Contents(url,[Headers = [
13. #"Content-Type"="application/json",
14. #"Authorization" = "Bearer"&Token1,
15. #"Ocp-Apim-Subscription-Key" =
    #"Ocp-Apim-Subscription-Key"],
16. Content = Json.FromValue([
    filters= [
      relationships=[ ],
      entities=[ ],
      accounts=[ ],
      portfolios=[ ],
      legacyRelationshipIds=[ ]
    ] ] ) ] )),
17. Response = Source[Response],

18.

19. #"Converted to Table" =
    Table.FromList(Response,
    Splitter.SplitByNothing(), null,
    null, ExtraValues.Error),
20. #"Expanded Column1" =
    Table.ExpandRecordColumn(
    #"Converted to Table", "Column1",
    {
21.  "relationshipKey",
22.  "relationshipName",
23.  "relationshipDescription",
24.  "relationshipWealthSource",
25.  "relationshipTypeKey",
26.  "relationshipNotes",
27.  "relationshipStatusKey",
28.  "legacyId",
29.  "isInEdit",
30. },
31. {
32.  "relationshipKey",
33.  "relationshipName",
34.  "relationshipDescription",
35.  "relationshipWealthSource",
36.  "relationshipTypeKey",
37.  "relationshipNotes",
38.  "relationshipStatusKey",
39.  "legacyId",
40.  "isInEdit",
41. })
42. in
43. #"Expanded Column1"
44.
45.
46.
47.
48.
49.
1.4.2 PowerBI
Important Considerations
PowerBI and Excel have many similarities when it comes to sourcing data from APIs. Like Excel, PowerBI also relies on PowerQuery Advanced Editor. The queries are written in M code. To access the Advanced Editor, go to the "Home" tab and select "Transform data".

Instructions
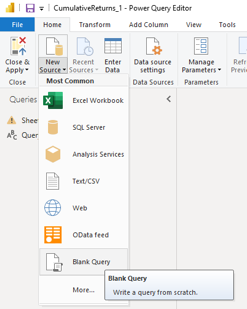
1. Once in the Power Query Editor, to add a new API connection select "New Source" → "Blank Query" from the "Home" tab:
2. Then select the "Advanced Editor" option, as demonstrated below:
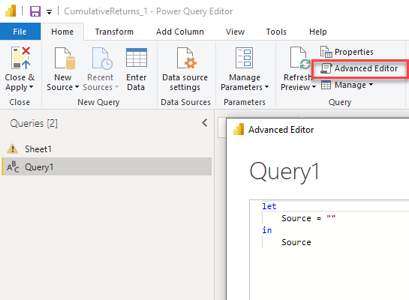
3. From this point forward, you can edit the "xxx" placeholders in the template below to connect to the API.
4. Note that just like with the Excel example above, you do not need to pull in all the available columns in this request. Rather, the flexibility of the API allows the user to only pull the columns the user needs for the analysis.
POST/GetRptEntities
POST/GetRelationships
1.  let
2.    url = "https://api01devtest.azure-api.net/
             etonapi/v1/GetRptEntities",
3.    BuildQueryString = Uri.BuildQueryString(Parsed_JSON),
4.    Source = Json.Document(Web.Contents(url,[Headers = [
5.      #"Content-Type"="application/json",
6.      #"Authorization" = "Bearer"&Token1,
7.      #"Ocp-Apim-Subscription-Key" = "xxx"],
8.    Content = Json.FromValue([
9.       version=1,
10.      entityKey= -9999,
11.      filters=null,
12.      sort=null,
13.      offset=0,
14.      limit=999999]) ] )),
15.   Response = Source[Response],
16.   #"Converted to Table1" = Table.FromList(
      Response, Splitter.SplitByNothing(), null,
      null, ExtraValues.Error),
17.   #"Expanded Column1" = Table.ExpandRecordColumn(
      #"Converted to Table", "Column1", {
18.     "RelationshipBK",
19.     "RelationshipName",
20.     "RelationshipType",
21.     "RelationshipStatus",
22.     "EntityBK",
23.     "EntityName",
24.     "EntityShortName",
25.     "EntityType",
26.     "EntityStatus",
27.     "EntityDescription",
28.     "EntityTaxStatus",
29.     "EntityCurrency",
30.     "ChartOfAccounts",
31.     "AccountingMethod",
32.     "COABK"},
33.    {"RelationshipBK",
34.     "RelationshipName",
35.     "RelationshipType",
36.     "RelationshipStatus",
37.     "EntityBK",
38.     "EntityName",
39.     "EntityShortName",
40.     "EntityType",
41.     "EntityDescription",
42.     "EntityTaxStatus",
43.     "EntityCurrency",
44.     "ChartOfAccounts",
45.     "AccountingMethod",
46.     "COABK"})
47. in
48.   #"Expanded Column1"
1.  let
2.    url = "https://api01devtest.azure-api.net/
             etonapi/v1/relationship/list",
3.    BuildQueryString = Uri.BuildQueryString(Parsed_JSON),
4.    Source = Json.Document(Web.Contents(url,[Headers = [
5.      #"Content-Type"="application/json",
6.      #"Authorization" = "Bearer"&Token1,
7.      #"Ocp-Apim-Subscription-Key" = "xxx"],
8.    Content = Json.FromValue([
9.      filters= [
10.      relationships=[ ],
11.      entities=[ ],
12.      accounts=[ ],
13.      portfolios=[ ],
14.      legacyRelationshipIds=[ ] ]])])),
15.   Response = Source[Response],
16.   #"Converted to Table1" = Table.FromList(
      Response, Splitter.SplitByNothing(), null,
      null, ExtraValues.Error),
17.   #"Expanded Column1" = Table.ExpandRecordColumn(
      #"Converted to Table", "Column1", {
18.     "relationshipKey",
19.     "relationshipName",
20.     "relationshipDescription",
21.     "relationshipWealthSource",
22.     "relationshipTypeKey",
23.     "relationshipNotes",
24.     "relationshipStatusKey",
25.     "legacyId",
26.     "isInEdit"
27.    },
28.    {
29.     "relationshipKey",
30.     "relationshipName",
31.     "relationshipDescription",
32.     "relationshipWealthSource",
33.     "relationshipTypeKey",
34.     "relationshipNotes",
35.     "relationshipStatusKey",
36.     "legacyId",
37.     "isInEdit"
38.    })
39. in
40.   #"Expanded Column1"
41.
42.
43.
44.
45.
46.
47.
48.
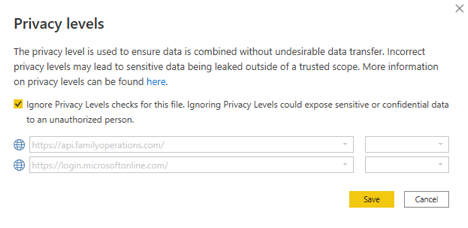
5. Note that the first time you add a connection, PowerBI will prompt you to specify the privacy level settings. Please select "ignore privacy levels" and click save. Note that the reason this selection must be made is due to a PowerBI limitation related to POST requests.
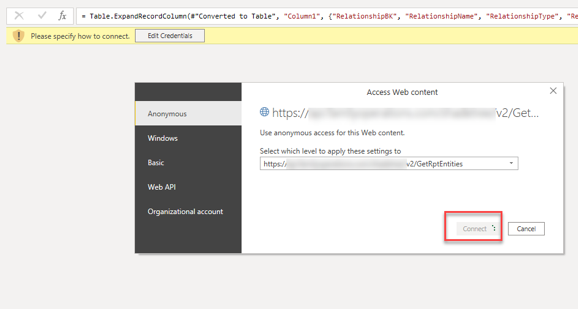
6. Note that the first time you add a connection, PowerBI will prompt you to specify how to connect. Chose the url at the bottom of the dropdown menu and click "Connect", as demonstrated below.
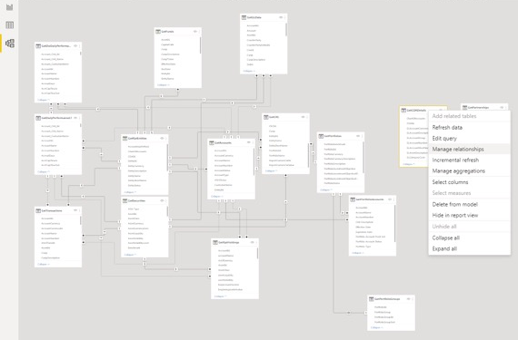
7. After several data sources have been added to PowerBI, the user can easily visualize the added tables and specify relationships between these tables through the "Model" pane.
8. Adding relationships between the tables is important for reporting purposes. As a rule, PowerBI automatically deducts the connection between the tables in the data model. However, not all relationships can be automatically identified and it's advisable to verify whether the relationships between the tables are correct and complete. To add a relationship, right click on the object, and select "Manage Relationships" and then click on the "New" option, as demonstrated below.
1.5 Adding a GET method API connection example
The GET API Request passes the parameters in the URL, rather than in the Body. While the general process of adding a GET method API is similar to the examples above, the code in the Power Query Editor will not include the body element.
1.5.1 Excel Template for adding a GET method API connection (GetHoldings)
GET/GetHoldings for Excel Template
1.  let
2.     url = #"GetHoldings url",
3.     BuildQueryString = Uri.BuildQueryString,
4.     Source = Json.Document(Web.Contents(url,[Headers = [
5.        #"Content-Type"="application/json",
6.        #"Authorization" = "Bearer "&Token1,
7.        #"Ocp-Apim-Subscription-Key" = #"Ocp-Apim-Subscription-Key"]] )),
8.     Response = Source[Response],
9.     #"Converted to Table" = Table.FromList(Response, Splitter.SplitByNothing(), null, null, ExtraValues.Error),
10.    #"Expanded Column1" = Table.ExpandRecordColumn(#"Converted to Table", "Column1",
11.    {
12.     "cusipDescription",
13.     "units",
14.     "price",
15.     "marketValue",
16.     "taxCost",
17.     "unrealGainLoss",
18.     "accruedIncome",
19.     "totalMarketValue",
20.     "priceDate",
21.     "entityName",
22.     "accountName",
23.     "sector",
24.     "industry",
25.     "assetLiquidity",
26.     "LiquidityCategory",
27.     "assetVolatility",
28.     "volatilityCategory",
29.     "geography",
30.     "SubAssetClass",
31.     "SuperAssetClass",
32.     "AssetClass",
33.     "AsOfDateKey",
34.     "Custodian",
35.    },
36.    {
37.     "cusipDescription",
38.     "units",
39.     "price",
40.     "marketValue",
41.     "taxCost",
42.     "unrealGainLoss",
43.     "accruedIncome",
44.     "totalMarketValue",
45.     "priceDate",
46.     "entityName",
47.     "accountName",
48.     "sector",
49.     "industry",
50.     "assetLiquidity",
51.     "LiquidityCategory",
52.     "assetVolatility",
53.     "volatilityCategory",
54.     "geography",
55.     "SubAssetClass",
56.     "SuperAssetClass",
57.     "AssetClass",
58.     "AsOfDateKey",
59.     "Custodian"
60.   })
61. in
62.   #"Expanded Column1"
1.5.2 PowerBI Template for adding a GET method API connection (GetHoldings)
GET/GetHoldings for PowerBI Template
1.  let
2.     url = "https://api01devtest.azure-api.net/etonapi/v1/GetHoldings?tenantKey=xxx&portfolioKey=xxx&entityKey=xxx&dataType=holdings&relationshipKey=xxx&asOfDate=xxx&stateFilter=xxx",
3.     BuildQueryString = Uri.BuildQueryString,
4.     Source = Json.Document(Web.Contents(url,[Headers = [
5.        #"Content-Type"="application/json",
6.        #"Authorization" = "Bearer "&Token1,
7.        #"Ocp-Apim-Subscription-Key" = "xxx"]] )),
8.     Response = Source[Response],
9.     #"Converted to Table" = Table.FromList(Response, Splitter.SplitByNothing(), null, null, ExtraValues.Error),
10.    #"Expanded Column1" = Table.ExpandRecordColumn(#"Converted to Table", "Column1",
11.    {
12.     "cusipDescription",
13.     "units",
14.     "price",
15.     "marketValue",
16.     "taxCost",
17.     "unrealGainLoss",
18.     "accruedIncome",
19.     "totalMarketValue",
20.     "priceDate",
21.     "entityName",
22.     "accountName",
23.     "sector",
24.     "industry",
25.     "assetLiquidity",
26.     "LiquidityCategory",
27.     "assetVolatility",
28.     "volatilityCategory",
29.     "geography",
30.     "SubAssetClass",
31.     "SuperAssetClass",
32.     "AssetClass",
33.     "AsOfDateKey",
34.     "Custodian",
35.    },
36.    {
37.     "cusipDescription",
38.     "units",
39.     "price",
40.     "marketValue",
41.     "taxCost",
42.     "unrealGainLoss",
43.     "accruedIncome",
44.     "totalMarketValue",
45.     "priceDate",
46.     "entityName",
47.     "accountName",
48.     "sector",
49.     "industry",
50.     "assetLiquidity",
51.     "LiquidityCategory",
52.     "assetVolatility",
53.     "volatilityCategory",
54.     "geography",
55.     "SubAssetClass",
56.     "SuperAssetClass",
57.     "AssetClass",
58.     "AsOfDateKey",
59.     "Custodian"
60.   })
61. in
62.   #"Expanded Column1"
1.6 Adding a POST method API connection example
The POST API Request passes the parameters through a body. Please refer to Section 1.4 for examples of adding a new API connection that uses the POST method.
1.7 Configuring the body of the API request
Many of the AtlasFive Business APIs are POST requests that allow the user to make targeted requests through specifying the elements in the body of the request. The section below provides examples of how to make use of the body in order to make more precise API requests.
As shown in Section 1.4, the body of the request contains the elements outlined below:
Excel (Option#1)
Excel (Option#2)¹
PowerBI (Default values)
1. body = "{
2.   ""version"":"&version&",
3.   ""entityKey"":"&entityKey&",
4.   ""filters"":"&filters&",
5.   ""sort"":"&sort&",
6.   ""offset"":"&offset&",
7.   ""limit"":"&limit&"}",
8.
1.  Content = Json.FromValue([
2.    version=1,
3.    entityKey=-9999,
4.    filters=null,
5.    sort=null,
6.    offset=0,
7.    limit=99999 ]
8.  ) ] )),
1. body = "{
2.   ""version"" : 1
3.   ""entityKey"" : -9999
4.   ""filters"" : null
5.   ""sort"" : null
6.   ""offset"" : 0
7.   ""limit"" : 99999}"
8.
¹ Please refer to section 1.4.1 for details on Option #1 and Option #2
As you can see, the elements in the Excel and PowerBI version are the same. The only difference is the fact that in Excel the values in the body are pulled through from the values specified by the user in the Query Customization tab (Option #1), whereas in Excel (Option #2) and PowerBI the values are hardcoded into the M code. The section below will discuss each element in the body and provide examples of how to use it.
Version
The AtlasFive business API version. This version is related to the AtlasFive release version you are currently on.
EntityKey
This is the unique identifier of each entity. The default value is -9999, which will return all the entity values available. However, if you want to make a request for a specific entity, you should replace -9999 with the respective entity key value.
Filters
The filters allow the user to make specific requests. For example, if you have 10 financial statement groups in total, but only want the FSG API to return 1 or 2 specific financial groups, you can specify this in the filters as follows:
The default value is null: ""filters"" : null,
To edit the query, specify the FSG names in the filters row as follows:
1 FSG Example:
1. ""filters"": "" AND [FS Custom Group] IN ( 'xxx Financial Statement Summary' )"",
2 FSG Example:
1. ""filters"": "" AND [FS Custom Group] IN ( 'xxx Financial Statement Summary', 'Estate Planning Financial Statement' )"",
Sort
This element allows you to specify which column you would like the data to be sorted by. For example, if in the GetCOADetails request, you would like to sort by the GLCategoryCode column in the ascending order for a particular entity, all you need to do is specify the entityKey and replace the default value of the “sort” element with the following:
1. "sort" : "order by GLCategoryCode asc",
Offset and Limit
All APIs contain are configured to have a maximum amount of data that can be transmitted through 1 API request. Please refer to Section 6 for a list of technical specifications and limitations of the AtlasFive Business APIs. Currently the maximum limit is 99,999 or less or a response size limit of 100 MB. If the dataset contains more than the configured limit, the user must make 2 requests and use the "offset" and "limit" elements of the body to obtain the data needed first, and then concatenate the results into one table using PowerBI, if the user requires all data to be present in one table.
The offset element defines the first-row number that must be retrieved by the API.
The limit element defines the number of elements following the offset element that must be retrieved by the API.
For example: If offset is set to 0 and the limit is set to 99,999, the API will retrieve row number 0 through 99,999 elements of the dataset. If offset is set to 99,999 and limit is set to 99,999, the API will retrieve the row numbers 99,999 through 199,998. Both tables will have 99,999 elements, but the data in each table will be different. This is called pagination and will be discussed in more details in Section 6.
Pagination
Request 1 body

Request 2 body

The example above demonstrates how a user can get all the data required in separate tables. After sourcing the data, the user can use PowerBI to concatenate the data into one table.
2 Successful API Responses²
200 OK
The request succeeded. The result meaning of "success" depends on the HTTP method:
GET: The resource has been fetched and transmitted in the message body.
POST: The resource describing the result of the action is transmitted in the message body.
201 Created
The request succeeded, and a new resource was created as a result. This is typically the response sent after POST requests, or some PUT requests.
² For additional HTTP response status codes, please review: https://developer.mozilla.org/en-US/docs/Web/HTTP/Status
3 Client Error API Responses
400 Bad Request
The server could not understand the request due to invalid syntax.
401 Unauthorized
Although the HTTP standard specifies "unauthorized", semantically this response means "unauthenticated". That is, the client must authenticate itself to get the requested response.
4 Server Error API Responses
500 Internal Server Error
The server has encountered a situation it does not know how to handle. If you continue to receive server errors, record the following details:
Request: url, method, header information like the access token used, body
Response: header, body
Your application configuration, e.g., client_id
If you continue to receive errors, reach out to the Eton Solutions service desk technical support channel.
501 Not Implemented
The request method is not supported by the server and cannot be handled. The only methods that servers are required to support (and therefore that must not return this code) are GET and HEAD.
502 Bad Gateway
This error response means that the server, while working as a gateway to get a response needed to handle the request, got an invalid response.
503 Service Unavailable
The server is not ready to handle the request. Common causes are a server that is down for maintenance or that is overloaded. Note that together with this response, a user-friendly page explaining the problem should be sent. This response should be used for temporary conditions and the Retry-After HTTP header should, if possible, contain the estimated time before the recovery of the service. The webmaster must also take care about the caching-related headers that are sent along with this response, as these temporary condition responses should usually not be cached.
System Outages
Due to the nature of cloud APIs, Eton Solutions services are occasionally interrupted or temporarily unavailable for reasons outside of our control. Assume that any API call you make to Eton Solutions, or any third party could potentially fail. Always include error-handling logic in your requests. See the sections above for API error codes and messages.
5 Other Common Excel/PowerBI Errors and Troubleshooting
1. Using the wrong privacy level settings
Please refer to the Supplemental Steps section to verify that the correct privacy level settings have been applied to your Power Query editor.
2. Sending invalid authorization credentials
APIs that implement OAuth2 usually require an “Authorization” header for each request. The authorization credential in this case is obtained through the Token1 tab configured in the Excel template through the custom MFA add-in.
3. Selecting a connection type different from the “Anonymous” option
For this spreadsheet to work, all the requests made must be made through the “Anonymous” access web content option. Usually when configuring the API connection for the first time, this error might appear and prevent the spreadsheet from connecting to the API.
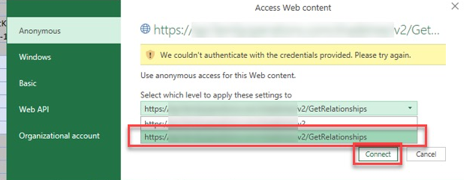
To ensure the access web content is anonymous, select from the dropdown menu of options the URL at the bottom of the dropdown menu and click “Connect”. If that does not load the table, and the same error message appears as shown above, try closing out of the Access Web Content window and clicking “Refresh Preview”. This should help the “Anonymous” selection go into effect.
4. PowerQuery editor syntax error
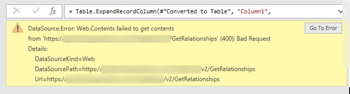
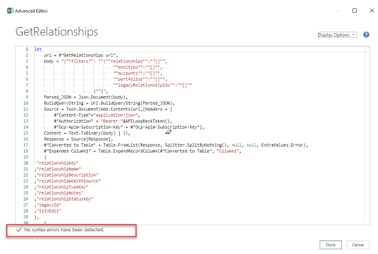
It is important that after editing API request elements in the PowerQuery Editor the automated syntax checker at the bottom confirms no syntax errors have been identified. Common syntax errors include omitting a comma at the end of the data operation, omitting a parenthesis or curly bracket, misspelling a variable or the name of a previous data step. All these errors will result in a Bad Request error message as shown below.
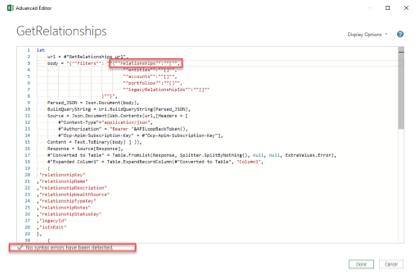
However, note that having the “No syntax errors have been detected” message at the bottom of the query editor does not necessarily guarantee that the query is correct. Syntax errors may still be present. For example, if the elements inside the “body” are isolated between quotation marks, but an element is misspelled, the PowerQuery editor will not be able to detect that error. Another example is including an extra set of quotation marks around the body elements.
No syntax errors:
No syntax errors message appears even when the relationships string is missing a parenthesis:
5. Table not loading:
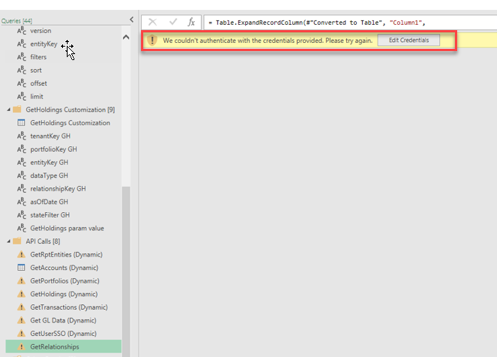
When an exclamation mark icon appears near a table name, as shown below, the table failed to load. Potential errors could be related to a PowerQuery editor syntax error discussed above. The error could also be related to invalid authorization credentials or selecting a connection type different from the "Anonymous" option discussed above.
Other common examples include loading a data from a source such as an Excel spreadsheet that no longer exists on the machine. Usually, the exclamation mark is paired with an error message in the main preview window that provides additional context for the error. In the example below, the path specified for the data source no longer contains the source excel document.


6. Incomplete dataset loaded (requires pagination)
It is important to check that the dataset loaded contains all the rows of data available and is not being cut off. For example, if the dataset contains 100,000 rows, but only 90,000 rows are loaded, the reasons behind the discrepancy must be investigated. This issue might be related to the “limit” element of the body. All APIs contain are configured to have a maximum amount of data that can be transmitted through 1 API request. Please refer to Section 6 for a list of technical specifications and limitations of the AtlasFive Business APIs and to Section 1.7 for detailed information on how to use the offset and limit elements of the body to request data in batches.
7. Using http:// instead of https:// or misspelling the URL
Please make sure the URL is spelled exactly as specified in the documentation.
8. Using the wrong HTTP method
Using the wrong method such as “GET” instead of “POST” could result in a status Code 404 error, with the error message "Resource not found". Please refer to the API documentation to ensure that the correct method is used.
6 Architecture and Technical Limitations of the API
6.1 Architecture
The AtlasFive Business APIs are a set of REST APIs implemented on a serverless architecture. The architecture leverages Azure Functions, a serverless solution that scales automatically depending on resource demand. Each function within the Azure Functions application is managed by Azure API Management Service. Azure API Management Service is a reliable, secure, and scalable way to publish, consume and manage APIs running on Microsoft Azure platform. It provides all essential tools required for an end-to-end management of APIs.
6.2 Technical Limitations
All APIs have technical limitations that are important to consider and be aware of. The following quotas apply to the AtlasFive Business APIs:
API Request rate limit: 10 requests/minute/member.
To reduce the chance that a request server errors, simplify the request by following the suggestions below:
Make the request more specific, which could be achieved by:
Reducing the date range of the request
Using the filters available in the body of the request
Trying to execute the request with a record limit of 99,999 or less or a response size limit of 100 MB
Reduce the number of dimensions in the request. Dimensions are attributes of your data. For example, the dimension City indicates the city, for example, "Paris" or "New York", from which a session originates.
Reducing the number of metrics in the request. Metrics are quantitative measurements. The metric Session is the total number of sessions that originate from a City.
For example, the table below shows one dimension (City) and two metrics (Sessions and Pages/Session).
Dimension
Metric
Metric
City
Sessions
Pages/Session
San Francisco
5,000
3.74
Berlin
4,000
4.55
Do not continuously resubmit a failed request. Instead, alert the Eton Solutions support desk (support@eton-solutions.atlassian.net) with the summary of your issue and follow the steps outlined in Section 7.
Note that the APIs are currently provided for free, but Eton Solutions reserves the right to charge for the APIs in the future.
7 How to Request Help?
When requesting the creation of a new API that is currently not offered or requesting that an existing API is modified with additional data, the end user must communicate their request along with any relevant details (such as the purpose of the request, specific data elements required, the level of priority of the request etc.) to the Client Relationship lead either by e-mail or through a service desk request.
Typically, we recommend that high priority issues like server errors or technical issues with existing APIs be emailed to the support desk (support@eton-solutions.atlassian.net) and CC'd to the Product Experience lead to increase the visibility of the issue.
For lower priority items, such as requests for additional capabilities or APIs to be developed as well as improvement recommendations please submit a helpdesk request through the portal support tab.
Following this process helps the helpdesk keep a good record of all incoming requests and prioritize effectively.
8 Supplemental Steps to disable Privacy Level Settings
According to Microsoft documentation, in Power BI Desktop, privacy levels specify an isolation level that defines the degree that one data source will be isolated from other data sources. Although a restrictive isolation level blocks information from being exchanged between data sources, it may reduce functionality and impact performance.
Please consult additional Microsoft documentation here: https://docs.microsoft.com/en-us/power-bi/enterprise/desktop-privacy-levels.
Other helpful resources to better understand privacy level settings in PowerBI can be found here: https://blog.crossjoin.co.uk/2017/05/24/data-privacy-settings-in-power-bipower-query-part-1-performance-implications/
Please note that users are responsible for ensuring that their privacy level setting selections comply with their company IT policies and procedures.
Note that keeping the privacy level settings enabled may lead to the following error messages to appear:
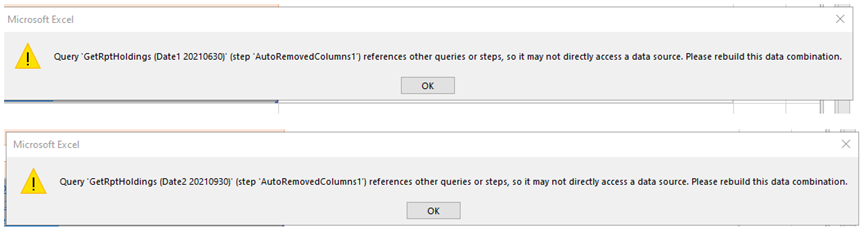
Updating the privacy level settings according to the recommendations below will resolve the issue and allow the user to get a 200-OK API response.
Steps to disable Privacy Level Settings
1. Go to the Excel Spreadsheet's Data tab, and select Get Data
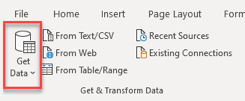
2. Select Launch Power Query Editor
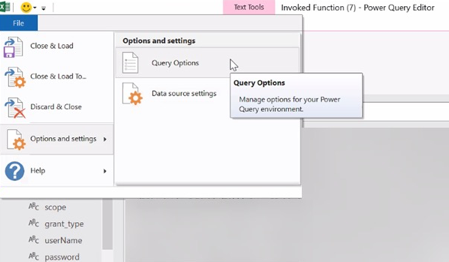
3. In the Power Query Editor go to the "File" window as shown below, and select the "Options and Settings" tab, then "Query Options"
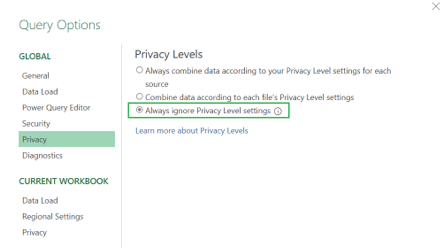
4. Go to "Privacy" and select the “Always ignore Privacy Level settings” as shown below
5. Click OK, then go to the Token1 tab in the Excel spreadsheet, right click the token value and refresh.